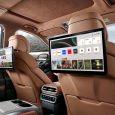
If your PlayStation 3 is happily pushing video to a TV or monitor but your desk speakers are sitting there like two decorative potatoes, you are not alone. The PS3 was built in an era when home theater gear was everywhere, which means it offers several audio paths, but not all of them are obvious if you are using computer speakers instead of a big living-room receiver.
The good news: you absolutely can connect a PS3 to computer speakers. The better news: you have more than one way to do it. Whether your speakers use a 3.5mm plug, red-and-white RCA inputs, or even optical input, there is usually a clean workaround that fits your gear and your budget.
In this guide, we will walk through four practical methods, explain who each one is best for, and help you avoid the classic mistakes, like plugging into the wrong port, choosing the wrong PS3 audio setting, or discovering way too late that your monitor’s “audio” jack is not actually the kind of audio jack you thought it was. Let’s save your game night from silent explosions and mute boss fights.
What You Should Know Before You Start
The PS3 can send audio through several output types, and that is the whole reason this guide exists. In plain English, here is the important part:
- HDMI can carry both video and audio.
- Optical digital audio can carry digital sound to compatible speakers, soundbars, DACs, or receivers.
- AV Multi Out can send standard stereo audio, which is perfect for many powered computer speakers and older speaker systems.
That means the “best” way to connect a PS3 to computer speakers depends on one question: what input do your speakers actually have? Most computer speakers use one of these:
- 3.5mm AUX input
- RCA red/white input
- Optical input on higher-end powered speakers
If you identify that first, the rest gets much easier. It is basically console-audio speed dating. You are just trying to find the right match.
Method 1: Connect the PS3 Through AV Multi Out to RCA or 3.5mm Speakers
Best for: Simple stereo speaker setups
This is the most direct old-school method, and honestly, it still works beautifully. If you have powered speakers with RCA inputs, or speakers with a 3.5mm AUX input plus an RCA adapter, this is often the easiest route.
What you need
- A PS3 AV cable or compatible AV Multi Out cable
- Powered speakers with RCA input, or
- A 2-RCA-to-3.5mm adapter if your speakers use a headphone-style plug
How to set it up
- Plug the AV cable into the PS3’s AV MULTI OUT port.
- Use the red and white audio plugs from that cable.
- Connect those plugs directly to your speakers, or connect them to an RCA-to-3.5mm adapter first.
- On the PS3, go to Settings > Sound Settings > Audio Output Settings.
- Select Audio Input Connector / SCART / AV MULTI.
- Save the setting and test audio.
This method gives you straightforward 2-channel stereo sound. That is totally fine for most desktop speaker sets. You are not trying to recreate a movie theater in your dorm room. You are trying to hear the game without routing cables through the known universe.
Why this method is great
- Cheap and easy
- No extra powered converter required in many cases
- Works especially well with older speakers and basic PC speakers
What to watch out for
If your PS3 is sending video over HDMI to a monitor or TV at the same time, you may need to check the console’s sound settings carefully. The PS3 lets you choose where audio goes, and if it is set to HDMI only, your AV cable may sit there doing absolutely nothing except emotionally supporting your cable management.
If you want audio available across multiple outputs, the PS3 also has an Audio Multi-Output setting that can help in some desk setups where HDMI handles picture and another port handles sound.
Method 2: Use the PS3 Optical Output With Speakers, a DAC, or a Receiver
Best for: Better sound quality or speakers with optical input
If your speakers, soundbar, mini amp, or desktop DAC have an optical input, this is one of the cleanest ways to get audio from a PS3. The PS3 includes a DIGITAL OUT (OPTICAL) port, and it is handy if you want digital audio without relying on HDMI.
What you need
- An optical TOSLINK cable
- One of the following:
- Speakers with built-in optical input
- An optical-to-analog DAC if your speakers only accept 3.5mm or RCA
- A receiver or amplifier with optical input
How to set it up
- Connect the optical cable from the PS3 to your speaker system, DAC, or receiver.
- If you are using a DAC, connect the DAC’s analog output to your computer speakers.
- On the PS3, go to Settings > Sound Settings > Audio Output Settings.
- Select Digital Out (Optical).
- Choose the audio formats your device supports.
- Save and test.
This method is especially useful if your speaker setup is a little more serious than bargain-bin plastic cubes. A DAC can convert the PS3’s digital optical signal into analog audio that ordinary powered speakers can understand. In other words, it acts like a translator between “console language” and “speaker language.”
Why this method is great
- Can sound cleaner than basic analog hookups
- Good for soundbars, desktop DACs, and higher-end powered speakers
- Helpful when HDMI is already busy handling your display
What to watch out for
Not every DAC is the same. Some are basic stereo converters, while others are designed for more advanced home audio setups. If your end goal is regular computer speakers, you usually want a simple optical-to-RCA or optical-to-3.5mm solution. Also, make sure your device supports the format you select in the PS3 menu. If you choose more than the device can handle, you may end up with silence, stuttering audio, or a sudden desire to throw a controller into the sun.
Method 3: Run HDMI to a Monitor, Then Connect Speakers to the Monitor’s Audio-Out Jack
Best for: Desk setups where your monitor has a headphone or line-out port
This is one of the neatest solutions when it works. Many modern monitors accept audio over HDMI and then pass that sound out through a 3.5mm headphone jack or line-out port. If your monitor supports that feature, you can connect your PS3 to the monitor via HDMI for video and audio, then plug your computer speakers into the monitor.
What you need
- An HDMI cable from PS3 to monitor
- Computer speakers with a 3.5mm plug, or an adapter if needed
- A monitor with an actual audio-out or headphone-out port
How to set it up
- Connect the PS3 to your monitor using HDMI.
- Plug your speakers into the monitor’s audio-out or headphone jack.
- Set the PS3 audio output to HDMI.
- Raise the monitor volume if it has volume controls or an on-screen menu.
- Test the sound.
If your monitor has no built-in speakers, do not panic. That does not automatically mean this method is dead. Some monitors do not play sound themselves but still pass HDMI audio through to a 3.5mm jack for headphones or external speakers.
Why this method is great
- Clean setup with fewer adapters
- Perfect for desk gaming
- Lets one HDMI cable handle most of the hard work
What to watch out for
This only works if your monitor actually has an audio-out feature. Some monitors have an audio port that is input only, while others have no usable audio output at all. That is where people get burned. The port is there, hope rises, cables are purchased, and then nothing happens. Always check your monitor’s specs or manual before betting on this method.
Also, if the monitor’s jack is line-out rather than a powered headphone jack, you still need powered speakers. Passive speakers alone will not magically wake up and perform.
Method 4: Use an HDMI Audio Extractor
Best for: Monitors with no audio-out and speakers that only take analog or optical input
If Method 3 would be perfect except your monitor offers zero help with audio, an HDMI audio extractor is your hero. This device sits between the PS3 and your display. It pulls the audio signal out of HDMI and gives you a separate audio output, usually 3.5mm, RCA, optical, or some combination of the three.
What you need
- PS3
- HDMI cable to the extractor
- HDMI cable from extractor to monitor or TV
- Your chosen speaker cable: 3.5mm, RCA, or optical
- Powered computer speakers or a compatible audio system
How to set it up
- Connect the PS3 HDMI output to the extractor’s HDMI input.
- Connect the extractor’s HDMI output to your monitor or TV.
- Connect your speakers to the extractor’s audio output.
- Set the PS3 audio output to HDMI.
- If the extractor has a 2-channel or 5.1 switch, choose the mode that matches your speaker setup.
- Test and adjust volume.
This is the most flexible method in the guide. It works beautifully when you have a monitor with no speakers, no headphone jack, and no interest in replacing perfectly good desk speakers just because the PS3 showed up to the party.
Why this method is great
- Very flexible
- Works with many speaker types
- Lets you keep HDMI video quality while breaking out separate audio
What to watch out for
Choose an extractor that matches your needs. If your speakers are stereo computer speakers, a model with 3.5mm or RCA analog out is ideal. If you have a digital speaker system or soundbar, an extractor with optical out may be better. Also, some extractors have mode switches for 2-channel PCM versus multi-channel output. For ordinary PC speakers, stereo mode is usually the smart choice.
Which Method Is Best?
Here is the quick reality check:
- Use AV Multi Out if you want the cheapest, simplest analog connection.
- Use optical if your speakers, DAC, or receiver support it and you want a clean digital path.
- Use the monitor’s audio jack if your monitor supports HDMI audio pass-through.
- Use an HDMI audio extractor if your monitor is video-only and your speakers need a separate audio feed.
If you want the least hassle, Method 1 or Method 3 usually wins. If you want the most compatibility, Method 4 is the most dependable problem-solver.
Common Troubleshooting Tips
No sound at all
Double-check the PS3 audio output setting. This is the number-one culprit. The console may still be set to HDMI, optical, or AV Multi Out from a previous setup.
Picture works, but speakers stay silent
Make sure the speakers are powered on, connected to the correct input, and turned up. Also confirm that your monitor’s audio jack is an output, not an input.
Optical setup gives you silence
Verify that your DAC or speakers support the selected audio format. When in doubt, use a simpler stereo-compatible setting.
Extractor works for video but not audio
Check the extractor’s audio switch or mode selector. Some need to be set to stereo or PCM for simple computer speakers.
Final Thoughts
Connecting a PS3 to computer speakers is one of those tasks that seems weirdly complicated until you realize the console is actually giving you several valid routes. The trick is not forcing the wrong one. Match the PS3’s output to your speakers’ input, use the correct setting in the sound menu, and suddenly the whole thing becomes far less mysterious.
For some people, the right answer is a humble AV cable and an adapter. For others, it is optical audio through a DAC or a sleek little HDMI extractor doing the heavy lifting behind the desk. Either way, there is no reason your PS3 has to sound like it is trapped in another room.
And honestly, once you hear the menu clicks, soundtrack swells, and absurdly dramatic boss music coming through real speakers, you will wonder why you spent so long tolerating silence in the first place.
Real-World Setup Experiences: What It’s Actually Like to Use These Methods
In real-life use, people usually land on one of these four methods because of whatever is already sitting on the desk. That matters more than tech pride. If someone already owns a solid pair of desktop speakers with a 3.5mm plug, the AV Multi Out route often feels like the quickest win. It is not glamorous, but it is satisfying in the same way that finding the exact charger you need in a drawer full of mystery cables is satisfying. You plug it in, switch the PS3 setting, and suddenly the startup sound plays like a tiny victory parade.
The optical method tends to appeal to people who care a little more about sound quality or who already have powered speakers, a DAC, or a compact receiver. This setup usually feels cleaner once it is done, especially on a desk where you want the PS3, monitor, and speakers to coexist without looking like a spaghetti convention. The biggest emotional arc here is confusion followed by smugness. Confusion when you first see format options in the PS3 menu, then smugness when the sound finally locks in and everything feels a little more premium.
The monitor pass-through method is the one that feels the most elegant when it works. One HDMI cable goes from the PS3 to the monitor, the speakers plug into the monitor, and the desk stays tidy. It is the kind of setup that makes you feel like a cable-management genius for at least seven minutes. The catch is that not every monitor plays nice. Some pass audio through beautifully, some need volume changes in the monitor menu, and some give you a jack that looks promising but behaves like an unhelpful extra in a sitcom. That is why this method creates the widest range of user experiences, from “that was easy” to “why does this port even exist?”
The HDMI audio extractor route usually becomes the hero story. It is what people end up using after discovering that their monitor is basically a fancy silent rectangle. Once installed, though, it often solves everything at once. Video still goes to the monitor, audio breaks out to the speakers, and the whole setup suddenly feels modern enough to stop being annoying. Users who choose this path often say the same thing in different words: “I wish I had bought this first.” That is the universal language of consumer electronics.
Another common experience is realizing that powered speakers make life dramatically easier. If your speakers already have their own power and volume control, almost every method in this guide becomes more reliable. Passive speakers, by contrast, tend to turn a simple setup into a side quest involving amplifiers, receiver compatibility, and at least one late-night search spiral. So if your goal is practical gaming audio, powered computer speakers are usually the least dramatic option.
There is also a funny psychological shift that happens once the setup is finished. Before the connection works, audio feels like an annoying technical detail. After it works, it becomes part of the nostalgia. Suddenly old PS3 games sound richer, menu music feels more intentional, and even cheesy sound effects hit a little harder through real speakers than through a weak display. That is why this topic keeps coming up. It is not just about making sound happen. It is about making an older console fit naturally into a modern desk setup without losing the charm that made people keep the PS3 around in the first place.

